Battery switch on travel trailer function is crucial for managing your RV’s power. Understanding how to use your battery switch—whether it’s a simple 1-2-both or a more complex model—is key to preventing electrical issues and maximizing battery life. This guide will walk you through the basics, safety precautions, troubleshooting, and maintenance tips to keep your travel trailer’s power system running smoothly.
We’ll cover different battery switch types, wiring diagrams, safe switching procedures, common problems (like corrosion and loose connections), and how your battery switch interacts with other components like your converter, inverter, and solar panels. We’ll also show you how to troubleshoot issues and perform preventative maintenance to extend the life of your battery switch.
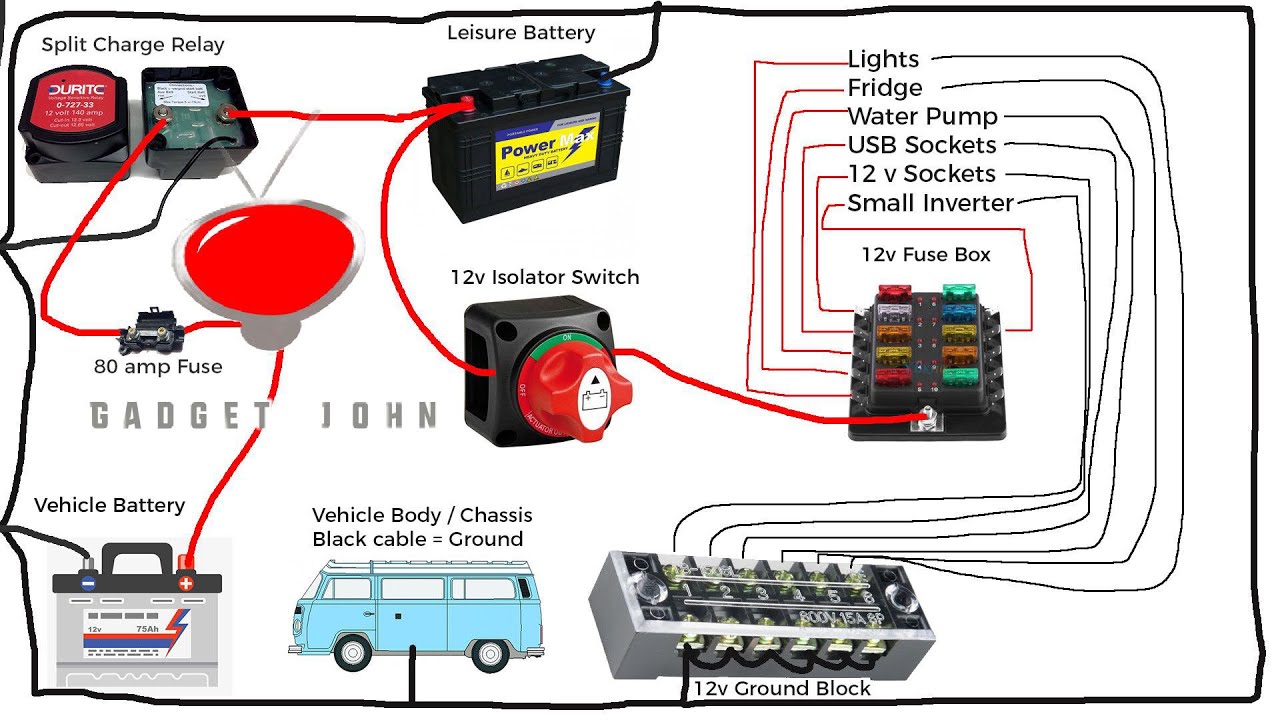
Understanding Battery Switch Functionality in Travel Trailers

Your travel trailer’s battery switch is a crucial component for managing power from your house battery (powering interior lights, appliances, etc.) and your chassis battery (powering engine starting and other vehicle functions). Understanding its operation is key to preventing electrical issues and ensuring you have power when you need it.
A battery switch acts as a central control point, allowing you to select which battery or combination of batteries are connected to your trailer’s electrical system. This is essential for conserving battery power, preventing accidental drain, and managing the charging of your batteries. Proper use prevents draining your starting battery when parked, and keeps your house battery charged via your tow vehicle’s alternator.
So, you’re an audiophile who travels? Awesome! Check out this guide on creating the perfect audiophile travel setup for pristine sound on the go. It covers everything from portable DACs to noise-cancelling headphones. Want something a bit more rugged? Then you might prefer the tips and tricks found in this other guide on audiophile travel aetup for the adventurous listener.
Both resources offer practical advice for maintaining high-quality audio while you explore the world. Happy listening!
Battery Switch Types
Travel trailers typically use one of two main types of battery switches: a 1-2-Both switch or a 1-2-Off switch. The 1-2-Both switch offers three positions: “1” connects only the house battery, “2” connects only the chassis battery, and “Both” connects both batteries in parallel. The 1-2-Off switch adds an “Off” position, completely disconnecting both batteries from the trailer’s electrical system.
So, you’re an audiophile who loves to travel? Awesome! Check out this guide on building the perfect audiophile travel setup for those epic adventures. It’s all about finding that sweet spot between portability and sound quality. Then, once you’ve got your portable system dialed in, consider some more advanced options like the ones discussed in this other great resource on audiophile travel setups – it delves into some really cool, compact equipment.
Remember, good sound shouldn’t be confined to your living room!
This is beneficial for long-term storage to prevent parasitic drain.
Internal Components and Functions
Inside a typical battery switch, you’ll find several key components working together. There’s a rotary selector switch that allows you to choose between the different positions (1, 2, Both, or Off). Heavy-duty contacts within the switch make and break the connections between the batteries and the trailer’s wiring. Fuses or circuit breakers are often incorporated into the switch to protect the wiring and batteries from overcurrent situations.
The switch itself is usually mounted in a weatherproof enclosure for outdoor use.
Wiring Diagram
The following diagram illustrates a common wiring configuration for a battery switch in a travel trailer, connecting both the house battery and the chassis battery. Remember, always consult a qualified electrician for any electrical work on your trailer.
| Component | Description |
|---|---|
| House Battery | Provides power for interior lights, appliances, etc. |
| Chassis Battery | Provides power for engine starting and other vehicle functions. |
| Battery Switch | Controls the connection between the batteries and the trailer’s electrical system. |
| Positive (+) Terminals | Connects to the positive (+) posts of the batteries and the main power distribution panel. |
| Negative (-) Terminals | Connects to the negative (-) posts of the batteries and the main power distribution panel, often through a ground bus bar. |
| Main Power Distribution Panel | Distributes power to various circuits throughout the trailer. |
Connecting and Disconnecting Batteries Using the Switch: Battery Switch On Travel Trailer Function
Knowing how to safely operate your travel trailer’s battery switch is crucial for maintaining your power systems and preventing damage. This section details the proper procedures for switching between your house and chassis batteries, highlighting important safety measures to prevent accidents.
A typical battery switch allows you to isolate or connect your house batteries (powering interior lights, appliances, etc.) and your chassis batteries (powering your engine starting system). Incorrect operation can lead to drained batteries, damaged electronics, or even electrical fires. Always prioritize safety when working with batteries and electrical systems.
Safe Switching Procedures
The following steps Artikel the safe and correct method for switching between your house and chassis batteries. Remember, the exact steps might vary slightly depending on your specific battery switch model, so always consult your owner’s manual for detailed instructions.
- Turn off all loads: Before making any changes to the battery switch, ensure all appliances and lights powered by the house batteries are turned off. This prevents potential sparks or surges when switching.
- Identify the switch positions: Most switches have clearly marked positions for “both,” “house,” “chassis,” and “off.” Familiarize yourself with these positions before proceeding.
- Switch to the “off” position: Begin by moving the switch to the “off” position. This completely disconnects both battery banks from the power system.
- Select your desired position: Once in the “off” position, move the switch to either “house,” “chassis,” or “both,” depending on which battery bank you need to use. “Both” connects both banks, “house” connects only the house batteries, and “chassis” connects only the chassis battery.
- Verify functionality: After switching, check that the intended power source is working correctly. Turn on a light or appliance to confirm the connection.
Safety Precautions When Using a Battery Switch
Working with batteries and electricity always carries inherent risks. Adhering to these safety precautions is essential to prevent accidents and damage.
- Avoid sparks: Never use tools or equipment that could create sparks near the battery terminals or the switch itself. Sparks can ignite flammable battery gases.
- Disconnect loads: Always turn off all appliances and lights connected to the batteries before switching. This prevents electrical surges and protects your equipment.
- Wear safety glasses: Battery acid is corrosive. Wear safety glasses to protect your eyes from splashes or fumes.
- Use insulated tools: If you need to work on the battery terminals or connections, use insulated tools to prevent electrical shock.
- Proper ventilation: Batteries release gases. Work in a well-ventilated area to prevent the buildup of potentially explosive fumes.
Potential Problems from Incorrect Use
Improper use of the battery switch can lead to several problems, impacting the lifespan and functionality of your batteries and electrical system.
- Drained batteries: Accidentally leaving the switch in the “both” position while only using one battery bank can drain both batteries quickly.
- Damaged electronics: Electrical surges caused by incorrect switching can damage sensitive electronics connected to the system.
- Electrical fires: Sparks from improper handling near the batteries can ignite flammable gases, potentially leading to a fire.
- Premature battery failure: Repeated incorrect switching can stress the batteries and shorten their lifespan.
Battery Switch Operation Flowchart
The following flowchart visually represents the steps involved in safely connecting and disconnecting batteries using a typical battery switch.
(Imagine a flowchart here. It would start with a circle labeled “Begin,” then have rectangular boxes for each step in the “Safe Switching Procedures” above, connected by arrows. The final box would be a circle labeled “End.” The flowchart would clearly show the “Off” position as a necessary intermediary step before selecting “House,” “Chassis,” or “Both.”)
Troubleshooting Common Battery Switch Issues
Your travel trailer’s battery switch is a crucial component, ensuring you can seamlessly switch between your tow vehicle’s charging system and your trailer’s house batteries. Problems with this switch can leave you stranded without power. Understanding common issues and troubleshooting steps is key to maintaining your RV’s electrical system.
Common problems with battery switches often stem from the harsh conditions they endure. Exposure to the elements, vibration during travel, and the corrosive nature of battery acid can all contribute to malfunctions. Let’s explore how to identify and fix these problems.
Identifying Common Battery Switch Problems
Identifying a faulty battery switch usually involves observing symptoms and performing some basic checks. A common indicator is the inability to switch between battery banks or a complete lack of power to the trailer’s systems. This could be due to corrosion on the terminals, loose connections, a faulty switch mechanism, or even a blown fuse within the switch itself.
Visually inspecting the switch and its connections is the first crucial step. Look for signs of corrosion (greenish or whitish residue), loose or damaged wires, and any physical damage to the switch itself. Testing the voltage at various points in the circuit can help pinpoint the exact location of the problem.
Troubleshooting Techniques for a Malfunctioning Battery Switch, Battery switch on travel trailer function
Before replacing the switch, systematic troubleshooting can save time and money. Start by visually inspecting the switch and its wiring for corrosion or loose connections. Clean any corroded terminals with a wire brush and baking soda solution. Tighten any loose connections. If the problem persists, use a multimeter to test the voltage at the battery terminals and at the input and output terminals of the switch.
This will help isolate whether the problem lies within the switch itself or elsewhere in the electrical system. If you find no voltage at the output terminals with the switch in the correct position, the switch is likely faulty. Always disconnect the negative battery terminal before performing any electrical tests.
Replacing a Faulty Battery Switch
Replacing a battery switch is a relatively straightforward process, but it requires some basic electrical knowledge and the right tools. First, disconnect both the positive and negative battery terminals. Then, carefully remove the switch from its mounting location, noting the wiring configuration before disconnecting any wires. Install the new switch, ensuring the wiring is correctly connected according to the manufacturer’s instructions.
Double-check all connections for tightness before reconnecting the battery terminals. After reconnection, test the switch to ensure it’s functioning correctly.
Comparison of Troubleshooting Methods
| Problem | Troubleshooting Method | Expected Outcome |
|---|---|---|
| No power to trailer systems | Visual inspection for loose connections and corrosion; voltage test at switch terminals and batteries. | Identifies loose connections, corrosion, or a faulty switch. |
| Intermittent power | Check for loose or corroded connections; test switch operation under various load conditions. | Reveals intermittent connections or a switch failing under load. |
| Switch won’t move | Inspect switch mechanism for obstructions or binding; check for sufficient switch actuation force. | Identifies mechanical issues within the switch. |
Mastering your travel trailer’s battery switch is a simple yet powerful way to enhance your RV experience. By understanding its function, practicing safe operation, and performing regular maintenance, you can ensure reliable power for all your onboard systems and prevent costly repairs down the line. Remember, a little preventative care goes a long way in keeping your RV adventures running smoothly!
FAQ Compilation
What happens if I leave my battery switch in the “off” position for an extended period?
Leaving the switch off for too long won’t damage the switch itself, but it will prevent charging of your house batteries. If you’re storing your RV for a long time, consider disconnecting the batteries entirely.
Can I use a battery switch to jump-start my travel trailer?
No, using the battery switch for jump-starting is generally not recommended. It’s better to use jumper cables directly connected to the batteries, following proper safety procedures.
How often should I inspect my battery switch?
Inspect your battery switch at least once a year, or more frequently if you use your RV often. Check for corrosion, loose connections, and any signs of damage.
What are the signs of a bad battery switch?
Signs include: inconsistent power, flickering lights, blown fuses, and difficulty switching between battery banks.
